Exterior Painting Part 3: Applying Caulk to Your Ann Arbor Home
This is a continuation of our previous tutorial on exterior house painting. Primer is next up!
Just a reminder that we also offer exterior painting. Find out more on our home page.
Caulking
This is the second part of our tutorial on how to paint a house. You can check out the first part, or you can head back to bandppainting.co home page if you’re looking for professional help with your painting project.
After scraping, caulking is an important step when preparing your home to be painted. Over time, temperature changes cause wood to expand and contract. Eventually this leaves gaps in your siding, as well as around your windows and doors. Not only will this give your home a solid, modern appearance, but in the chilly Ann Arbor winters you’ll be glad you sealed up all of the gaps.
Tools of The Trade
As with any job, it’s important to make sure you have the right tools on hand. Although some you can do without, being prepared will save you frustration and headache in the end.
Most importantly, you’ll need a caulking gun. Any kind will do. For caulk, it’s important to make sure you select a paintable silicone variety. You can get caulk that lasts 15 years, but I prefer to buy the kind that’s rated for 30 or more years. It’s only a few dollars more and can extend the longevity of your paint job.
A razor knife is needed to prepare the caulk, and a 5-in-1 painters tool will be helpful throughout the procedure. This tool will be very handy later on, so you might as well invest in one now. Finally, you’ll need two rags and a bucket of water.
Step 1: Preparation
Before you start any job, it’s important to give yourself a general overview. Walk around the perimeter of your home and identify any areas you’ll need to seal. For starters, you’ll need to seal the edges of all of siding against the corner board. Check all four sides of your doors and fill in any gaps you find. The same thing goes for windows. Once you’ve got any major spots, be on the lookout for cracks or gaps in the siding. In some cases, you’ll be laying down new calk. In others you’ll be removing old, worn out caulk and replacing it.
Once you know where you’re going to be working, you can prepare the caulk. Using the razor knife, remove the tip of the caulk. You should only remove about a quarter inch, and the cut should be made at a 45-degree angle.
Step 2: Laying Down Caulk
This procedure looks like it requires a lot of precision, but it’s actually quite simple. Gently squeeze the caulking gun until you start to feel a little pressure. In just a few seconds, you’ll see a bead come out of the tip of the caulking gun.
Touch the tip to the area you want to caulk, then begin to apply pressure while slowly moving down the seam. Once completed, you’ll have a nice round bead.
Step 3: Sealing
If you’ve seen completed caulk before, you’ll know that it’s got a nice round finish. This is done by taking your finger and running it down the bead. This process forces the caulk into the crack and helps create a good seal. If you want to keep your finger clean, dip them in the water before you seal the bead. This prevents caulk from sticking, which can save you a lot of time cleaning up later.
As you can see, caulking isn’t all that complicated. You get quick results, and this process will ensure that you end up with a professional looking paint job. Once you’re done, move on to step three in our guide.
Full Transcript
Today we're going to go over step three in the painting process and that's caulking. Now you're going to want to caulk your house because it makes it more energy efficient to seal up the gaps around the windows and doors. Also it just makes it look more solid. You get rid of those gaps in the trim boards and cracks in the foundation, et cetera. If you're going to sell your house you want to go through maybe a whole case of caulk just sealing everything up making it look real solid and new. Not giving the impression that it's old and worn out, you know, there's big gaps and everything everywhere.
Caulk can be very beneficial especially in cities like Ann Arbor where it can get really cold and really hot all within a few months of each other.
Now equipment that you're going to need for caulking includes of course a caulk gun, I like the Dripless kind. I like this 35 year silicone paintable caulk. Going to need a brand new razor knife to cut the tip off. You're going to need a bucket of water and a rag and also you're going to want a dry rag to put on your belt loop to wipe your fingers throughout the day. Also of course, you need a five way and a putty knife. As always it's helpful to have on on any phase of the painting job.
Now when you cut the tip off you just want to go back maybe a quarter inch, three eighths of an inch, do it at an angle. All right, now as we go around the house I'm going to point out a few spots that commonly need caulking and I'm going to demonstrate how to do it and make it look real neat. And that's pretty much all there is to it. Okay? Let's go outside.
You're going to want to caulk anywhere the corner boards meet the siding. See that crack in there? Follow it all the way down, in there it got wider where I dug the old caulk out. Now here's a good example of some corner board that could use some caulking to look a lot better. Get down there, it was probably never caulked. And when you're trying to sell a house or something, that stuff just looks ugly.
Now a lot of houses will have gaps between the pieces of siding. This house happens to have these little covers over the gaps, but a lot of houses, they're caulked and over time that caulk separates and dries out and creates a crack. You're going to want to hit any joints in the siding as well.
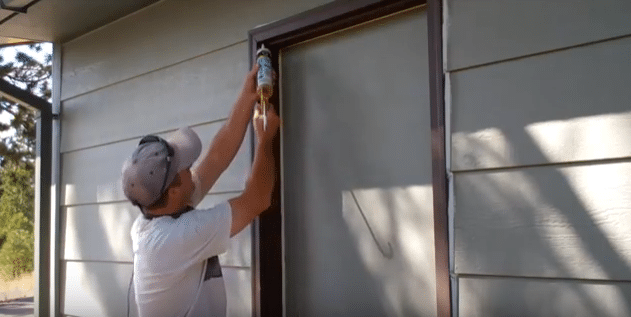
Now one spot you do not want to caulk are these natural gaps underneath the siding there. Just leave those alone. One common place that you're gong to want to look at for caulking are along the edges of door frames here where it meets the siding. Don't put too much on but make sure you get enough to fill any cracks. Take your bucket with your rag, get your finger a little wet. Get a glob out there on the siding, rub it in, get it all smooth and some people don't rub the caulk in with their fingers like this. They just run a bead and they end up with this kind of gloppy looking worm. I don't like that, I always rub it in, smooth it out with my fingers.
I also like to caulk in the door jams here, mostly on the outsides of houses you'll find that they never really got caulked. They just kind of slapped it together because it was the outside. They didn't figure anybody would ever notice. Some people think I'm picky but you know it only takes a second. Roll it down, you rub it in and then when you paint it you're not going to see any crack there. It's going to look solid, it's going to look tight. It's not going to look worn out with a big gap.
Here we've got a window frame. Same thing as the door frame. You're going to want to check all four sides and make sure there isn't any openings or cracks or gaps around it anywhere ... Handy thing to have along with you which I forgot to mention at the beginning of the video is a little duster brush. You can dust areas before you caulk them because if you caulk on top of dust or dirt, it's not going to stick. [Music 00:04:41]
One of these bucket hooks can be handy when you're working up on the ladder. Hook your bucket on there with your rag and your water and you can hook the caulk right on there too. Okay, so now you know how to caulk your house prior to painting. This is a very important step, not only for energy efficiency and get rid of the draftiness, but also just to prove the look of your house.
Now you can visit my website howtopaintahouseright.com where you'll find a lot of helpful information. You'll find free Pdf's, complete written instructions, equipment lists, paint estimator sheets, as well as a whole series of videos designed to help you paint your house right.
Related Articles
