Exterior Painting Part 2: Scraping Paint
Thanks to https://www.youtube.com/watch?v=aMxYVQ9LLAE for providing this video.
Today we're going to go over step two in the painting process and that is scraping. Tomorrow we will talk about applying caulk. Now some people think that scraping is no fun. Personally I think it's a great time to get some serious thinking done. There's a few things you want to know before you go out there to do a bunch of scraping.
If you're living in the Ann Arbor area, you've likely got quite a bit of peeling paint due to the extreme weather changes that occur over the year.
Resource: Home Depot Paint Scrapers
Painting your home is one of the most effective ways to improve both the comfort and the resale value of your home. Bandppainting.co has helped countless customers improve the feeling of their home. Our guides will help walk you through the process of painting your home. If you’re hiring professionals, this will help you know what to expect. But if you’re interested in a DIY project, these guides will tell you everything you need to know.
Because of the extreme weather changes we experience in the Ann Arbor area, peeling paint is a pretty common problem. Before you throw a new coat on, you’re first going to have to scrape all of the old paint. At first, scraping might seem like a tedious manual task. In reality, it’s much easier than you might think! All you need is a little time, and a few simple tools.
Tools of the Trade
You’ll need to get two different scrapers. The majority of your work will be done using a large, rigid scraper. We’ve always preferred curve blade scrapers, but a straight blade will work just as well if you prefer. It’s important to select one that is tough and rigid, as it’s going to have to withstand a lot of pressure.
For clearing out all the nooks and crannies, you’ll also want to pick up a small one-inch potting knife. In this case, flexibility is important. This will make it easier to work in tight spaces, and you’ll use this tool again later in the painting process.
Step 1: Test Old Paint
Prior to 1978, many homes used lead based paint. Lead is extremely toxic. When you’re scraping, paint particles can become airborne. You should never remove lead paint without proper training. If you’re unsure, you should purchase a testing kit to see if your paint contains lead or not.
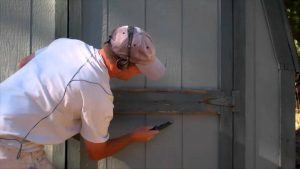
Step 2: Scrape With The Grain
Before you start scraping, take a look at the woodgrain. You’re going to want to work in the direction of the grain, removing any peeling paint. Make sure you use a lot of force. There might be a little paint left over, but this is nothing to worry about. Your objective is to create a flat surface for the new paint to bond to. As long as you’ve removed any surface anomalies, you can move on.
Step 3: Scrape Against The Grain
This step is very much like the first one, with one key difference. It’s possible to damage the wood when you’re working against the grain. You should scrape lightly – just enough to remove any remaining edges.
Step 4: Get Into The Nooks and Crannies
Once you’ve got most of the edges removed, it’s time to scrape the areas that the large scraper won’t reach. Your potting knife should help you out here. The process is the same as it was with the large scraper. You just need to take a little extra care to avoid damaging the wood.
Once you’ve scraped the entire house, you’ll be ready to move on to the next step. You’ll quickly learn that scraping isn’t as difficult as you may think. All you need is a little time and a little elbow grease, and you’ll be ready to apply a fresh coat of paint.
Related Articles
